Monday, 1 February 2016

Shooting on Location Research (Additional Post)

In this post I will be talking to you about Shooting on Location. 

Location shooting is the practice of filming in the actual setting in which a story takes place rather than on a sound stage or back lot. In filmmaking, a location is any place where a film crew will be filming actors and recording their dialogue. A location where dialogue is not recorded may be considered as a second unit photography site. 

In film, the second unit is a discrete team tasked with filming shots or sequences separate from the main or "first" unit. The second unit will often shoot simultaneously with the first unit, allowing the filming stage of production to be completed faster. For more information about the second unit click here 

Below is the second unit director for Harry Potter and the Goblet of Fire Peter MacDonald.


Filmmakers often choose to shoot on Location because they believe that greater realism can be achieved in a "real" place. However, location shooting is also often motivated by the films budget. For instance, the independent horror film Marianne was shot entirely on location in Sweden. However, many films shoot interior scenes on a sound stage and exterior scenes on location.

It is often mistakenly believed that filming "on location" takes place in a location where the story is set, but this is not necessarily the case. Most films do a bit of both location shooting and studio shoots. Although low budget films usually do more location shooting than bigger budget films because the cost of shooting at someplace that already exists is much cheaper than creating that place from scratch. Before shooting on location it is generally wise to conduct a recce.

There are some pros and cons that come with filming on location, here are a few of them;

Pros

  • It can be cheaper than constructing large sets.
  • The illusion of reality can be stronger - on set, it is hard to replicate real-world wear-and-tear, as well as architectural details.
Cons

  • Lack of control over the environment - Lighting, passing aeroplanes, traffic, pedestrians, bad weather etc. 
  • The difficulty of finding a real-world location which conforms with the requirements of the script.
  • Members of the audience may be familiar with a real-world location used to double as a fictional location.
  • If a particular location lacks production companies (supply sets and equipment) then transporting all the crew and equipment just to film on location can be extremely expensive. 
Shooting on Location Vs Shooting in a Studio


Production Design
The most obvious department that will play a part in this decision is the art department. On location, the space is already built. It may need to undergo some scenic work, such as a new paint job, or it may need to be furnished differently. But, everything is done on the surface. On a sound stage, everything would need to be built. This means not only the walls and furniture, but also any texture that can only be achieved through years of activity in a space. So, a lot of money can be spent recreating a genuine environment.

Camera
This department's advantages and disadvantages are closely linked to those of the art department. On location, the camera is locked into the space that exists. If you want to get a wide shot, you can only put you widest lens on and get as close to the wall behind you as possible. However, in a sound stage, your set walls can be built to fly away. This means much more flexibility as far as camera placement goes, and overall more working space available.

Lighting
On location, the sun plays a huge part in lighting conditions. If you are spending an entire day in a room with lots of windows, the light is going to change from morning, to afternoon, to evening. This means a lot of equipment is needed to control said changes and maintain continuity throughout the scene.
In a studio space, you do not have this problem because all the light (even a hypothetical sun) is artificial and therefore entirely in your control. However, you now need more lights in order to simulate the said sun as it would appear in each of your set's windows. You also need to account for what you can see through these windows, and how you would like to deal with that. On the other hand, studio lighting wins one more advantage with an available rigging grid, complete with electricity above the set.

Sound
There is a reason that it is called a "sound stage". A studio should be completely sound proof. No sound other than what is in the room can ruin a take. On location, you have to deal with "holding for a plane," strange plumbing sounds in your building, or neighbours yelling. Having control can make this department run seamlessly.

Production
At last, the biggest department of all. A good location manager should always be asking herself, where will we stage equipment? Where will actor holding be? Where can we park the trucks? Where are the bathrooms? Is there Internet available for the production team? Is there an elevator to get equipment to the sixth floor? All these questions are eliminated in sound stage shooting. Studios have all of these things taken care of for the production. The kicker is that the studio space costs money.

Locations and sound stages both have advantages and disadvantages. In many cases, the choice will come down to cost, but there are many other factors to consider as well. Also, keep in mind that you need location permits to shoot in many public places.

Here are some examples of films being shot on location and the locations that were actually used in the making of these films;

Jurassic Park

One part of Jurassic Park was filmed in Isla Sorna, Molokai, Hawaii. The excuse for the return Isla Sorna is the disappearance of young Eric Kirby while parasailing along the coast of the raptor infested isle.


Another part in Jurassic Park was filmed in Washington DC: Home of Dr Ellie Sattler. The location is 1230 Milan Avenue, Monterey road, South Pasadena.


Jurassic Park shooting on Location.


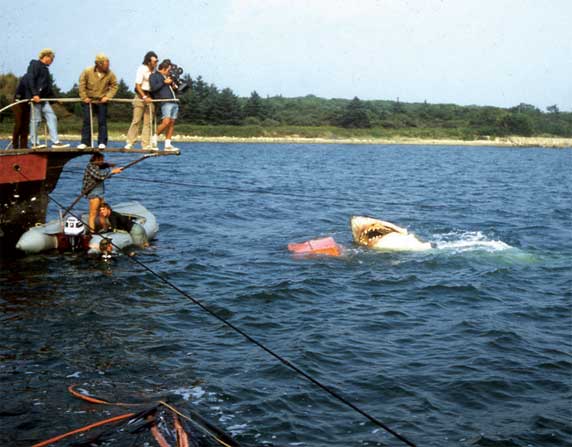
Jaws

Here are some of the locations used in the filming of Jaws;

American Legion memorial bridge and sengekontacket pond, Martha's vineyard, Massachusetts.


Chief Brody gets paintbrushes in the town centre of Amity Island, Edgartown, Martha's vineyard, Massachusetts.


The mayor has a word with Chief Brody. Chappaquiddick island ferry, Martha's vineyard, Massachusetts.


The orca sets sail and Quint's workshop. Menemsha Harbor, Martha's vineyard, Massachusetts.


Shooting on Location;


E.T

Elliot's house below the San Gabriel Mountains, Lonzo drive, Tujunga.


The flying Bicycles. White Oak Avenue, Porter Ranch.


Back to the Future

Doc Brown's house in the 50s. Gamble house, Westmoreland place, Pasadena.


Marty visits George as Darth Vader. 1711 Bushnell Avenue, Pasadena.


Marty's mum's house across the street. 1727, Bushnell Avenue, Pasadena.


Enchantment under the sea dance. First united Methodist church of Hollywood, Franklin Avenue, Hollywood.


Site of Doc's house in the 80's. North Victory Boulevard, Burbank. 


The McFly home. Roslyndale Avenue, Arleta, California. 

Green Street

The lads gather for a pre-match drink at "the abbey." The Griffin, Brook Road South, Brentford.

Bostonian Matt takes an unusual route from Paddington to Chelsea. Bank, City of London, EC3.

Matt stays with Shannon and her husband Steve in a very exclusive part of Chelsea. Cadogan Gardens, Chelsea, London.

Arriving at Manchester Piccadilly Station. Fenchurch street station, Fenchurch street, London.

Matt talks to his dad at the pub. New Moon Pub, Leadenhall market, London, EC3.

 Matt is spotted at the newspaper office. Lime Street, London, EC3. 

The Goonies

Jake Fratelli is sprung from jail. Clatsop County Building, Astoria.

Mikey's dad works at Astoria Historical Museum. Flavel house museum, 8th street, Astoria.

The Goonies follow one eyed Willy's map. Cannon Beach, Ecola state park, Oregon.

The Goonies emerge into daylight. Goat Rock Beach, Bodega Bay, Northern California.

Harry Potter and the Philosopher's Stone

Home of the Dursley's "4 Privet Drive." 12 Picket Post Close, Martin's Heron, Berkshire.

Harry talks the the Serpent. Reptile House, Regent's park zoo, London.

The entrance to the leaky cauldron. Bull's head passage, Leadenhall Market, London.

The interior of Gringott's bank. Australia House, Strand, London WC2. 

The film's platform 9 3/4. Platforms 4 and 5, King's cross station, London NW1.

Platform 9 3/4. by the entrance to platform 9, King's cross station, London NW1.

The corridors to Gryffindor at Hogwarts. the cloisters, Gloucester Cathedral, Gloucester. 

The quadrangle of Hogwarts. Durham Cathedral, County Durham. 

Hogwarts classrooms. Lacock Abbey, Lacock, Wiltshire.

Professor Snape's Potions class. Sacristy, Lacock Abbey, Lacock, Wiltshire.

Professor Quirrell's Defence against the dark arts classroom. Warming room, Lacock Abbey, Lacock, Wiltshire.

 Another Hogwarts location. Alnwick Castle, Northumberland.

Professor Flitwick's class. Harrow old schools, Harrow-on-the-hill. 

My next post will be shooting on location - Day 1.

Monday, 18 January 2016

Shooting Schedule

The final part before we can start filming is very vital as it gives us as the crew members an organised idea of when we are filming, at what time, at what location and what scene. It also gives the actors an idea of what will be going on while filming.
Below is the shooting schedule that we created as a group. The shooting schedule is vital to the filming process as filming will be done over a period of time so it keeps us and the actors organised and up to date to stop everyone getting confused as to where we are, what we have done so far and what we still need to do. Not all of the scenes will be filmed in order which happens in many films. Also the times might be changed as sometimes the actors might not be able to make it to filming so we will have to change the times around in order to fit around the actors.

Shooting Schedule

That is the final part of pre-production of our film so now all there is to do is the filming for our thriller opening Never Look Back.

Actor Release Forms

Now that we have covered the risks that are involved in filming our thriller opening, we are now going to look at the actor release forms which have to be signed by each one of our actors that will be appearing in our thriller opening. The actor release forms need to be done and considered as they are a very important and vital part of the filming process as it gives consent from our actors that they can take part in our film.
There are also terms and conditions that the actors need to give their consent to before they sign the actor release forms as the terms and conditions need to be stuck to and followed.

Terms and Conditions


Actor Release Form - Alex - played by Kyle Scale


Actor Release Form - Stacey - played by Annie Sutton


The next and final thing to post is the shooting schedule for our film.

Friday, 15 January 2016

Risk Assessment

In this post I will be embedding a document of our formal risk assessment. This document will assess all of the risks involved in creating our thriller opening never look back.
I have graded everything to see whether they are LOW risk MEDIUM risk or HIGH risk depending on how severe the risk is and the likelihood of how much people will get hurt.

Here is the document;

Risk Assessment


My next post will be the Actor release forms (One for each Actor).

Animatic

In this post I will be showing you mine and my groups finished animatics. We worked together as a group to create a storyboard and create a finalised animatics from that storyboard.
Here is our improved animatics including the titles and idents, soundtrack and it is now 2 minutes and under.


We exhibited our finished animatics to the class and got some feedback on what we could do to improve it. Here is the feedback we got;

You will exhibit your animatic at the start of the lesson. For each animatic, your peers will assess:
1    Is the narrative clear?
2    Have the group framed the images appropriately?
3    Have the group chosen the most effective shot types?
4    Is the film opening around 2 minutes in length?
5    Have the group included appropriate ident(s) & titles?
6    Does the soundtrack effectively support the images?
7    Does this animatic suggest that the group is ready for the shooting phase of the production process?

Elisa, Emma, Kelsey, Ben
  1. I understood the narrative until it got to the ending. I was quite confused about what was actually happening and the lack of background music really made me unsure of how to feel. The dialogue really helped me to understand it though. Flashbacks are hard to show in animatic so I can understand why I maybe misunderstood what was going on but do some research so you can achieve a good effect in your film rough cut.
  2. I think you have framed them well and the images are quite clear too.
  3. I think you have given the shot types a lot of thought and you have definitely used a variety of shots from close ups to mid shots and you have used them appropriately too. Maybe you should give more thought to the camera movements specifically too.
  4. 2:30 – You need to really cut this down which means cutting out some scenes or time that isn’t much important. There is also no ident to this which needs 6 seconds for 2 so you need to think about cutting is down to meet the 2 minute criteria.
  5. There is no ident and you really need to include this. I also think that you should maybe move the title to the beginning or the end instead of bang on in the middle. Its up to you really I just think it would be more effective at the end or beginning. You should use some titles as well because this is a key part really so give this some good thought.
  6. There is hardly any music in the background, which really made a huge impact. A soundtrack is a very important thing in a film and you really need to find music to make your film the best possible film opening it can be. Soundtrack really helps to set the scene and I would really suggest spending a lot of time on this.
  7.  I think you still need to plan things more thoroughly and you need to give the film a little more attention to detail. You are pretty much nearly ready just little more work and I think you would be ready to shoot.
I am now going to talk about how to present flashbacks.

  • We could have used colour in our animatics to show that the flashback was at a different time period. 
  • We could have also faded out and then faded back in to a completely different scene to show that it was a flashback, but again because it was all done in pencil so it was hard to tell which scene was which. 
Here is an example of a flashback in an animatic;


My next post will be the risk assessment.

Tuesday, 12 January 2016

Animatic Research

In this post I will be talking you through animatics. I will be carrying out research on animatics as we as a group have to create an animatic of our own for our thriller Never Look Back.

An animatic is a preliminary version of a film, produced by shooting successive sections of a storyboard and adding a soundtrack. An animatic is simply a series of still images edited together and displayed in sequence with rough dialogue and/or rough soundtrack added to the sequence of still images to test whether the sound and images work effectively together.

Animatics have changed a lot over time, they started in a very low tech manner - they were produced by filming or taping storyboards, then an editor would edit the footage to an audio track. These animatics would seem crude to today's standards, but people were able to do some remarkable work with just paper. Some companies still hang onto these old fashioned techniques, unwilling or unable to move to the next generation of production.
Today some animatic companies have developed their own computer-generated 2D and 3D art to use in their animatics. Some 3D figures look so realistic that the expense of photographing models for testing purposes has become a thing of the past.

There are 2 types of animatics a photomatic and a rip-o-matic. A photomatic is where they test their animatics or film using photography or videos that may or may not have originally been shot for something else. A photomatic is based around photography. An animatic based around re-purposed video is called a videomatic or rip-o-matic.

The elements of a film that should be included in an animatic is the soundtrack and the sound effects. The soundtrack and sound effects are an important part of an animatic because it simulates reality, it makes the audience feel as if they are a part of the scene.

It can also be used to create an illusion. For example;

"A man and a woman walk into a cafe. several other people are sitting at various tables deep in conversation. The main couple sits at a table and a series of close-ups for their conversation are presented."
By adding the sound effect of the off-scene diners the audience is convinced that they are still in the cafe. Obviously, the producer does not want to pay a group of extras to sit off camera, the sound editor places them there with his crowd for the sound

Another Example;

"A woman is sitting in her living room. The door opens and her husband walks into the room."
With the addition of a few sound effects it is possible to inform the audience that he has driven up to the house, parked his car, walked to the door and used his key to unlock the door. None of this was shot it was an illusion created with effects.

Sound effects can also be used to create mood, for example, loud, fast-paced sound effects can create an upbeat kind of mood. Slow sound effects can add a tense kind of mood to the scene.

Another element of a film that should be included in an animatic is the camera movements. Camera movements are important as they can direct the viewer's attention to a specific shot in the scene or to a significant part of the scene. It can also reveal off screen space, for example, the setting where the characters are could play an important part in the scene and could be significant to what is happening or what is going to happen in the scene.

Animatics are used to test films before they get distributed properly. The creators of the film develops several ideas. Animatics allows everyone to see what is and what is not working in the film and what needs to be changed in time so they can make significant improvements.
It allows the producer to look at the animatic and see if they like the structure and all of the elements of the film work together and if not then it gives them significant time to make some necessary changes.

Below I am going to embed some real life examples of animatics.

Despicable me 2


Here is how the scene turned out;


Joust


Batman


My next post will be our very own animatic that we have created as a group for our thriller opening never look back.

Monday, 11 January 2016

Storyboard

In this post I will be showing you the storyboard we have created as a group for our thriller opening Never Look Back.

Below I have embedded our full storyboard.


Flashback Scene;


My next post will be on Animatics research